Oracle RAC Architecture
A general pictorial guide for how to the install RHEL 5.4 for Oracle RAC can be found here

Hostname & IP Requirement
Machine
|
Public IP
|
Private IP
|
VIP
|
Storage IP
|
RAC Node1
|
192.168.1.16
|
192.168.0.21
|
192.168.1.21
|
192.168.1.15
(openfilersan.doyensys.com)
|
RAC Node2
|
192.168.1.17
|
192.168.0.22
|
192.168.1.22
|
192.168.1.15
(openfilersan.doyensys.com)
|
Machine
|
Public Name
|
Private Name
|
VIP Name
|
RAC Node1
|
racinst1.doyensys.com
|
racinst1-prv
|
racinst1-vip.doyensys.com
|
RAC Node2
|
racinst2.doyensys.com
|
Racinst2-prv
|
racinst2-vip.doyensys.com
|
SCAN IP Address for RAC
192.168.1.27 racinst-scan.doyensys.com racinst-scan
192.168.1.28 racinst-scan.doyensys.com racinst-scan
192.168.1.29 racinst-scan.doyensys.com racinst-scan
Add /etc/hosts entry for node 1


Add /etc/hosts entry for node2

 We have 2.6.18-164 so have to download the appropriate ASMLib RPMs from Link

 Configure the iSCSI (initiator) service
 Now that the iSCSI service is started, use the iscsiadm
command-line interface to discover all available targets on the network
storage server. This should be performed on both Oracle RAC nodes to
verify the configuration is functioning properly:
Now that the iSCSI service is started, use the iscsiadm
command-line interface to discover all available targets on the network
storage server. This should be performed on both Oracle RAC nodes to
verify the configuration is functioning properly:

Manually Log In to iSCSI Targets
At this point the iSCSI initiator service has been started and each of the Oracle RAC nodes were able to discover the available targets from the network storage server. The next step is to manually log in to each of the available targets which can be done using the iscsiadm command-line interface. This needs to be run on both Oracle RAC nodes. Note that I had to specify the IP address and not the host name of the network storage server ( openfiler1-priv) - I believe this is required given the discovery (above) shows the targets using the IP address.


Configure Automatic Log In
The next step is to ensure the client will automatically log in to each of the targets listed above when the machine is booted (or the iSCSI initiator service is started/restarted). As with the manual log in process described above, perform the following on both Oracle RAC nodes:


 Follow the same steps to discover the disk on second node


 Follow the steps to partion the Disks using fdisk


 Testcase from Node1:
 Test case from Node 2:


 Node 2:


 Click exit to complete the installation

 Node2:
 Node1:


Install the following RPM on both nodes
yum install -y binutils-2.*
yum install -y compat-libstdc++-33*
yum install -y elfutils-libelf-0.*
yum install -y elfutils-libelf-devel-*
yum install -y gcc-4.*
yum install -y gcc-c++-4.*
yum install -y glibc-2.*
yum install -y glibc-common-2.*
yum install -y glibc-devel-2.*
yum install -y glibc-headers-2.*
yum install -y ksh-2*
yum install -y libaio-0.*
yum install -y libaio-devel-0.*
yum install -y libgcc-4.*
yum install -y libstdc++-4.*
yum install -y libstdc++-devel-4.*
yum install -y make-3.*
yum install -y sysstat-7.*
yum install -y unixODBC-2.*
yum install -y unixODBC-devel-2.*
Change the Kernel Parameters
Add or amend the following lines to the "/etc/sysctl.conf" file.
Add or amend the following lines to the "/etc/sysctl.conf" file.
fs.aio-max-nr = 1048576
fs.file-max = 6815744
kernel.shmall = 2097152
kernel.shmmax = 1054504960
kernel.shmmni = 4096
# semaphores: semmsl, semmns, semopm, semmni
kernel.sem = 250 32000 100 128
net.ipv4.ip_local_port_range = 9000 65500
net.core.rmem_default=262144
net.core.rmem_max=4194304
net.core.wmem_default=262144
net.core.wmem_max=1048586
Run the following command to change the current kernel parameters.
Run the following command to change the current kernel parameters.
#/sbin/sysctl -p
Add the following lines to the "/etc/security/limits.conf" file.
Change the setting of SELinux to permissive by editing the "/etc/selinux/config" file, making sure the SELINUX flag is set as follows.
Create User and Groups for oracle

Create the directories on both nodes in which the Oracle software will be installed.


 Create a file called "/home/oracle/grid_env" with the following contents.

Install the following package from the Oracle grid media after you've defined groups.
Add the following lines to the "/etc/security/limits.conf" file.
oracle               soft    nproc   2047
oracle               hard    nproc   16384
oracle               soft    nofile  1024
oracle               hard    nofile  65536
Add the following lines to the "/etc/pam.d/login" file, if it does not already exist.
session required pam_limits.so
Change the setting of SELinux to permissive by editing the "/etc/selinux/config" file, making sure the SELINUX flag is set as follows.
Check the firewall service is running or not .SELINUX=permissive
# service iptables stop
# chkconfig iptables off
Either configure NTP, or make sure it is not configured so the Oracle Cluster Time Synchronization Service (ctssd) can synchronize the times of the RAC nodes. If you want to deconfigure NTP do the following.
If you want to use NTP, you must add the "-x" option into the following line in the "/etc/sysconfig/ntpd" file.# service ntpd stop Shutting down ntpd: [ OK ] # chkconfig ntpd off # mv /etc/ntp.conf /etc/ntp.conf.orig # rm /var/run/ntpd.pid
Then restart NTP.OPTIONS="-x -u ntp:ntp -p /var/run/ntpd.pid"
# service ntpd restart
Create User and Groups for oracle
Create the directories on both nodes in which the Oracle software will be installed.
mkdir -p  /u01/app/11.2.0/grid
mkdir -p /u01/app/oracle/product/11.2.0/db_1
chown -R oracle:oinstall /u01
chmod -R 775 /u01/
Create Environment file on both nodes
Create a file called "/home/oracle/db_env" with the following contents.
#cd /u01/Soft/grid/rpm
#rpm -Uvh cvuqdisk*
Create Disks for RAC installation
A general pictorial guide for how to install and configure SAN for RAC using OPENFILER
Internal Storage Details
Mount Point
|
Capacity
| |
Node1
|
Node 2
| |
/ root
|
20
|
20
|
/ swap
|
4 GB
|
4 GB
|
External Storage Details
Type
|
Size
|
LUNs Qty.
|
Voting disk
| ||
OCR
|
6
|
3
|
Flash back recovery
| ||
DATA
|
Installation of Oracle ASM
Instance 1:
Determine your current kernel version by using uname -r
Node 1:
Node 2:
Manually Log In to iSCSI Targets
At this point the iSCSI initiator service has been started and each of the Oracle RAC nodes were able to discover the available targets from the network storage server. The next step is to manually log in to each of the available targets which can be done using the iscsiadm command-line interface. This needs to be run on both Oracle RAC nodes. Note that I had to specify the IP address and not the host name of the network storage server ( openfiler1-priv) - I believe this is required given the discovery (above) shows the targets using the IP address.
Configure Automatic Log In
The next step is to ensure the client will automatically log in to each of the targets listed above when the machine is booted (or the iSCSI initiator service is started/restarted). As with the manual log in process described above, perform the following on both Oracle RAC nodes:
(cd /dev/disk/by-path; ls -l *openfiler* | awk '{FS=" "; print $9 " " $10 " " $11}')
Setting SSH for Grid Installation
Go to gridsoftware location cd /u01/Soft/grid/sshsetup/ and run the following command.
./sshUserSetup.sh -user oracle -hosts "racinst1 racinst2" -advanced -exverify -confirm
Configure ASM on Node1
Run runcluvfy.sh by following command
./runcluvfy.sh stage -pre crsinst -n racinst1,racinst2 -r 11gR2 -verbose
Grid Installation:
After Complted the installation check the cluster status on both nodes
Here the oc4j service is faild to start oc4j give the bellow mention command
ASMCA Configuration:
Database Home Installation:
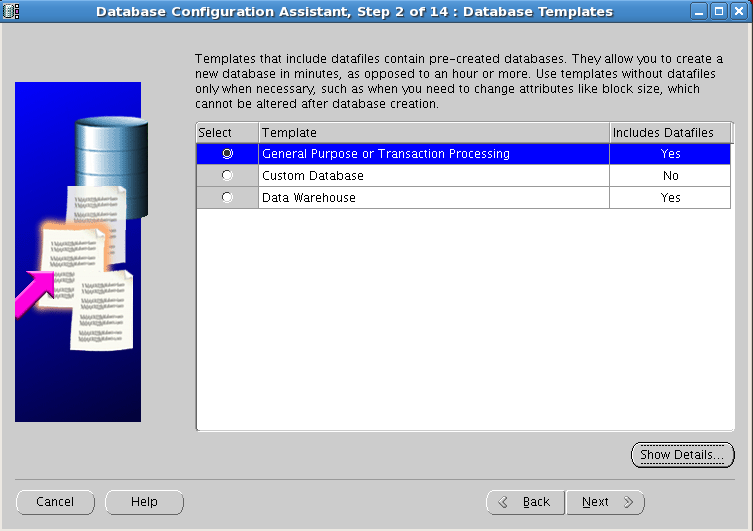
Create Database using dbca:
Remove the check mark “Enable automatic maintenance tasks”
Click on Yes button
Check whether DATA disk group is running on RAC Instances, if it is not running then start.
Update File Size as 1024 M Byes for all Redo Log
RAC instance status check:
Node1: